Environments
By default, there are 5 off-the-shelf RL environments:
Generalization environment
VaryingDynamics environment
Safe RL environment
MARL environment
Real-world environment
Generalization Environment
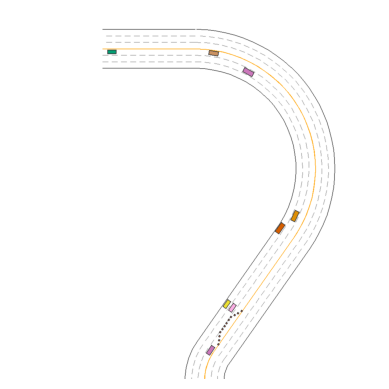
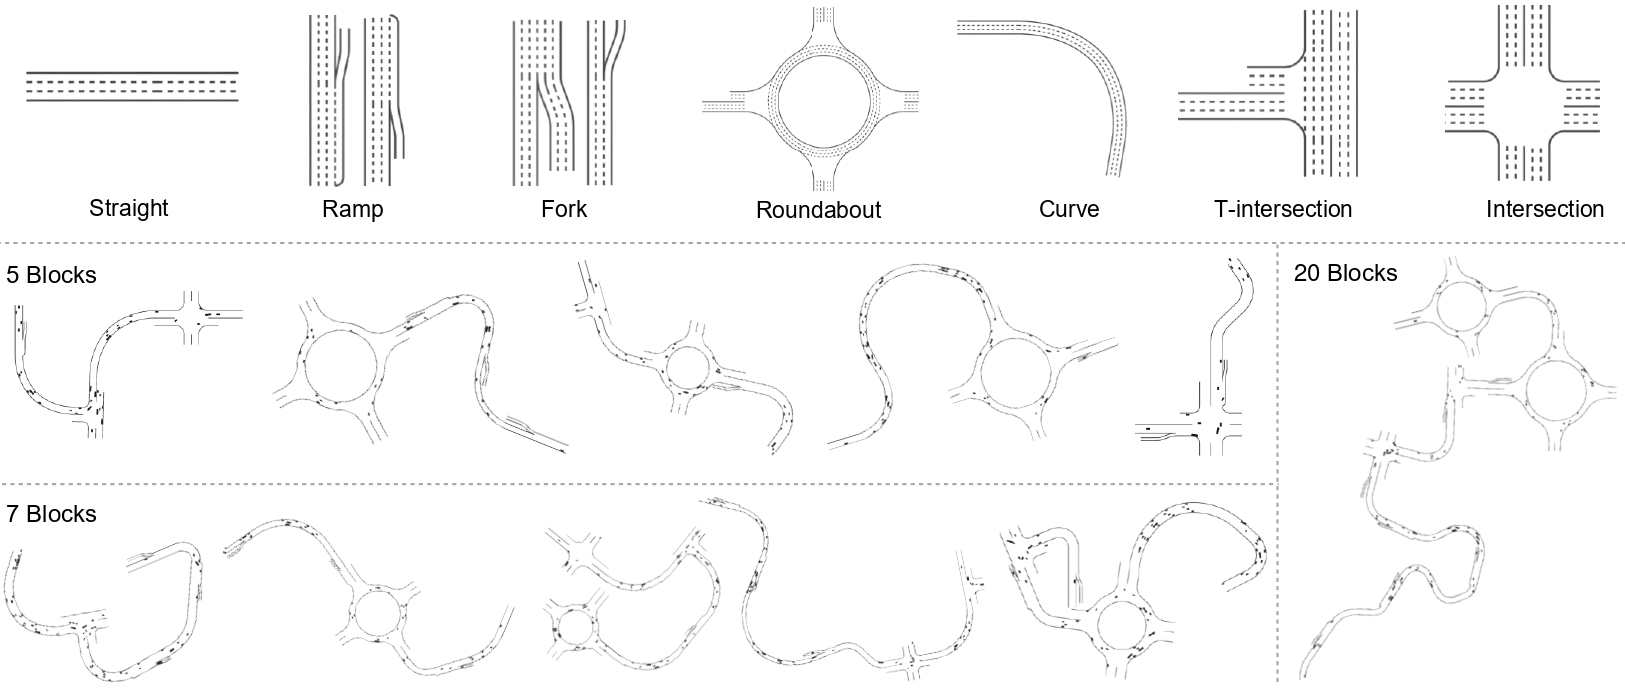
We developed an RL environment through procedural generation where maps are composed by connecting various types of road blocks and then traffic vehicles are scattered on maps randomly. Thus the environment can generate an unlimited number of diverse driving scenarios. By training RL agents in one set of scenarios and testing them in another held-out set, we can benchmark the generalizability of the driving policy.
You can experience this environment through the following script:
# args
# --observation: lidar, rgb_camera
python -m metadrive.examples.drive_in_single_agent_env --observation lidar
And the following script creates basic environments if you are using this environment in your code:
from metadrive import MetaDriveEnv
import tqdm

training_env = MetaDriveEnv(dict(
    num_scenarios=1000,
    start_seed=1000,
    random_lane_width=True,
    random_agent_model=True,
    random_lane_num=True
))


test_env = MetaDriveEnv(dict(
    num_scenarios=200,
    start_seed=0,
    random_lane_width=True,
    random_agent_model=True,
    random_lane_num=True
))
User can specify the training set with 1000 driving scenarios by setting num_scenarios=1000 and start_seed=1000, while creating the test set by setting num_scenarios=200 and start_seed=0.
In this case, the scenarios generated by random seeds [1000, 1999] will be used to train the agents and those by [0, 199] will be used to test the trained agent.
Note: Please note that each process should only have one single MetaDrive instance due to the limit of the underlying simulation engine, but sometimes we want to have one environment for training and the other one for testing. There are two ways to overcome this:
Launching the training environment and test environment in two separate processes using tools like
Rayorstablebaseline3.SubprocVecEnv. Generally, We use Ray/RLLib to train RL agents. The training and test environments are naturally hosted in training workers (processes) and evaluation workers. Therefore we do not worry about this singleton problem.Closing the training environment
training_env.close()before launch the test environment viatest_env.reset(). After evaluation, it is allowed to restore the training environment after closing the test environment by simplytraining_env.reset(). An example is as follows.
for training_epoch in range(2):
    # training
    training_env.reset()
    print("\nStart fake training epoch {}...".format(training_epoch))
    for _ in range(10):
        # execute 10 step
        training_env.step(training_env.action_space.sample())
    training_env.close()

    # evaluation
    print("Evaluate checkpoint for training epoch {}...\n".format(training_epoch))
    test_env.reset()
    for _ in range(10):
        # execute 10 evaluation step
        test_env.step(test_env.action_space.sample())
    test_env.close()

assert test_env.config is not training_env.config
Randomization
The other config dict(random_lane_width=True, random_agent_model=True, random_lane_num=True) specifies if the agent model, lane num and lane width will be randomized to make the scenarios more diverse. In the following example, we sample 50 scenarios from the training set and show the statistics.
from metadrive.component.vehicle.vehicle_type import vehicle_type

# container
env_seed=1000
lane_nums = set()
lane_widths = set()
vehicle_models = set()
traffic_vehicle_models = set()

# collect statistics
maps_to_sample = 50
end_seed = training_env.config["start_seed"] + maps_to_sample
for env_seed in tqdm.tqdm(range(training_env.config["start_seed"], end_seed)):

    # use `seed` argument to choose which scenario to run
    training_env.reset(seed=env_seed)
    lane_nums.add(training_env.current_map.config["lane_num"])
    lane_widths.add(training_env.current_map.config["lane_width"])
    vehicle_models.add(training_env.agent.__class__.__name__)
    traffic_models = set([obj.__class__ for obj in training_env.engine.traffic_manager.spawned_objects.values()])
    traffic_vehicle_models = traffic_vehicle_models.union(traffic_models)
    assert vehicle_type[training_env.agent.config["vehicle_model"]] is training_env.agent.__class__

training_env.close()

# show information
print("Number of lanes in {} maps are: {}".format(maps_to_sample, lane_nums))
print("{} maps have {} different widths".format(maps_to_sample, len(lane_widths)))
print("The policy is learning to drive {} types of vehicles".format(len(vehicle_models)))
print("There are {} types of traffic vehicles".format(len(traffic_vehicle_models)))

# check
assert lane_nums == {2, 3}
assert len(lane_widths) == 50
assert len(vehicle_models) == 5
assert len(traffic_vehicle_models) == len(vehicle_models) - 1
  0%|                                                                                                                                                                                | 0/50 [00:00<?, ?it/s][INFO] Assets version: 0.4.1.2
[INFO] Known Pipes: glxGraphicsPipe
[INFO] Start Scenario Index: 1000, Num Scenarios : 1000
100%|███████████████████████████████████████████████████████████████████████████████████████████████████████████████████████████████████████████████████████████████████████| 50/50 [00:06<00:00,  7.31it/s]
Number of lanes in 50 maps are: {2, 3}
50 maps have 50 different widths
The policy is learning to drive 5 types of vehicles
There are 4 types of traffic vehicles
There are more config terms for customizing this environment. The full config with comprehensive annotations is at METADRIVE_DEFAULT_CONFIG. Most of the fields are configuration for the reward, cost, termination function, while some of them can be changed to customize the environment.
Traffic
The first important field is traffic_density. The default value is 0.1. Increasing this value will make the traffic flow dense. Note: there is not an obvious relationship between this value and the number of vehicles. The following code calculates the average number of vehicles in environments with different traffic_density. We also turn off the logging, so you won’t see any [INFO] level messages.
from metadrive import MetaDriveEnv
import tqdm
import logging

# Default, traffic density=0.1
simple_env = MetaDriveEnv(dict(num_scenarios=10,
                               start_seed=0,
                               log_level=logging.WARNING))
# traffic density=0.5
complex_env = MetaDriveEnv(dict(num_scenarios=10,
                                start_seed=0,
                                traffic_density=0.5,
                                log_level=50)) # 50 == logging.WARNING

def calculate_traffic_vehicles(env, name):
    num_v = 0
    for seed in range(10):
        env.reset(seed=seed)
        num_v += len(env.engine.traffic_manager.spawned_objects)
    print("There are averagely {} vehicles in {}".format(num_v/10, name))
    env.close()

calculate_traffic_vehicles(simple_env, "environment with 0.1 density")
calculate_traffic_vehicles(complex_env, "environment with 0.5 density")
There are averagely 8.0 vehicles in environment with 0.1 density
There are averagely 43.4 vehicles in environment with 0.5 density
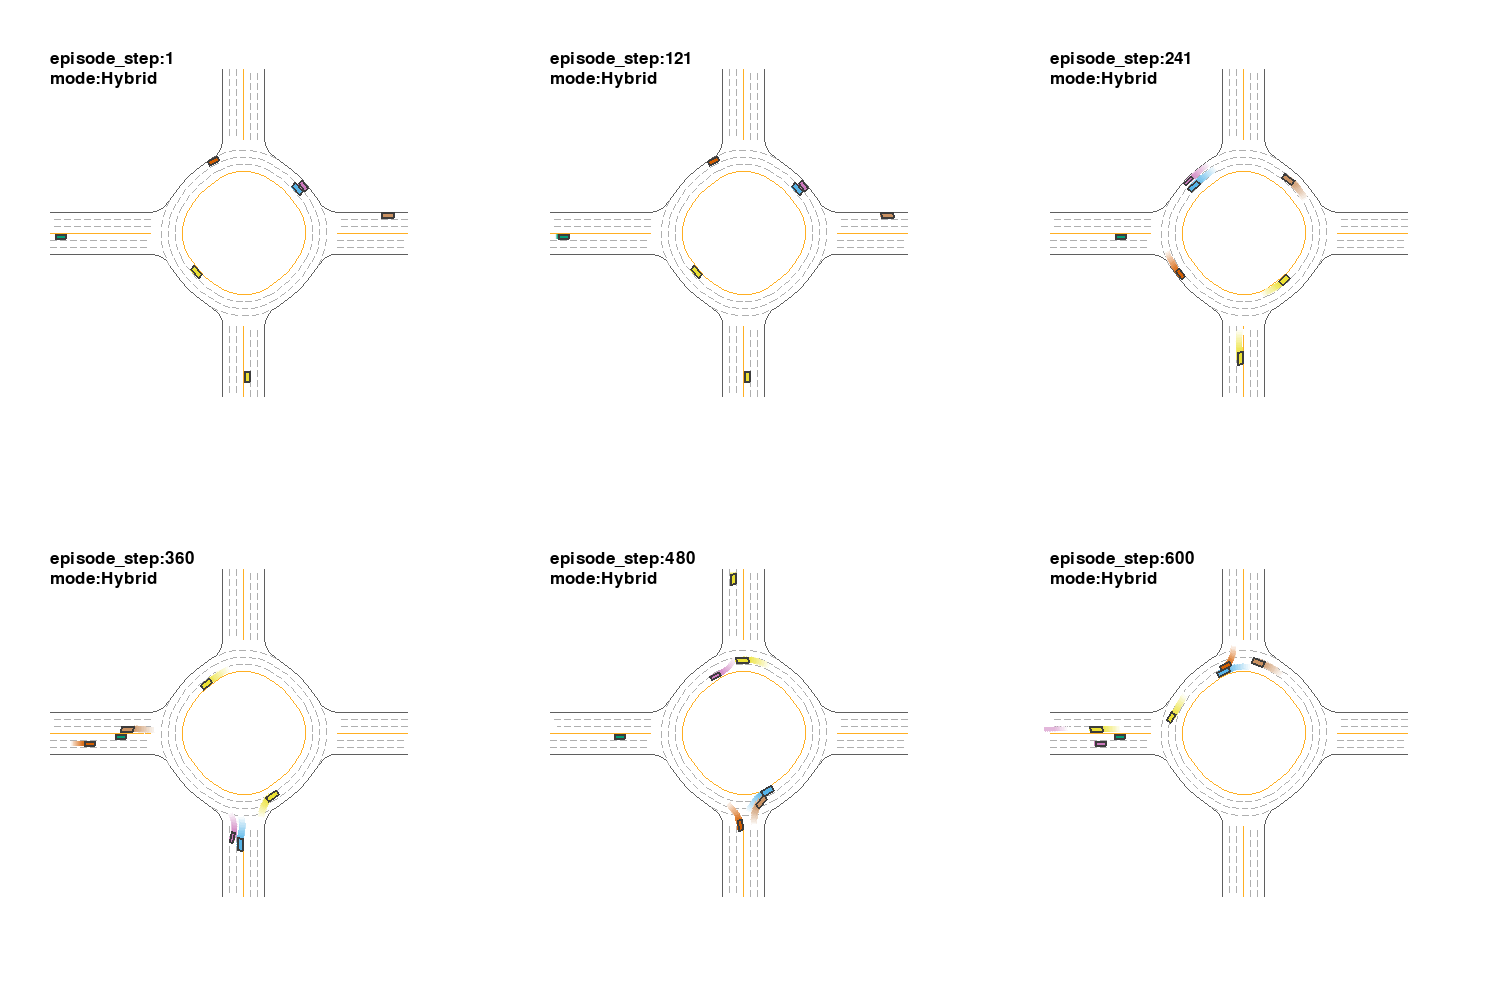
To maximize the interaction between ego car and traffic vehicles. The default traffic mode is trigger. In this mode, the traffic vehicles are scattered and keep static on the map and will be triggered to move only when the ego car is close to them. After the traffic vehicles reach the destination, they will be deleted from the scene. In the following example, the traffic vehicles in the roundabout are triggered when the step > 100 and the ego car enters the roundabout. It also demonstrates how to use top-down renderer. More details can be found at Top-down Renderer.
from metadrive import MetaDriveEnv
from metadrive.policy.idm_policy import IDMPolicy
from IPython.display import Image, clear_output

env = MetaDriveEnv(dict(traffic_mode="trigger", map="O"))
env.reset(seed=0)
try:
    for i in range(600):
        o,r,d,_,_ = env.step([0,-0.2] if i < 100 or i> 150 else [0, 0.2])
        env.render(mode="topdown",
                   scaling=2,
                   camera_position=(100, 0),
                   screen_size=(500, 500),
                   screen_record=True,
                   window=False,
                   text={"episode_step": env.engine.episode_step,
                         "mode": "Trigger"})
    env.top_down_renderer.generate_gif()
finally:
    env.close()
    clear_output()
Image(open("demo.gif", "rb").read())
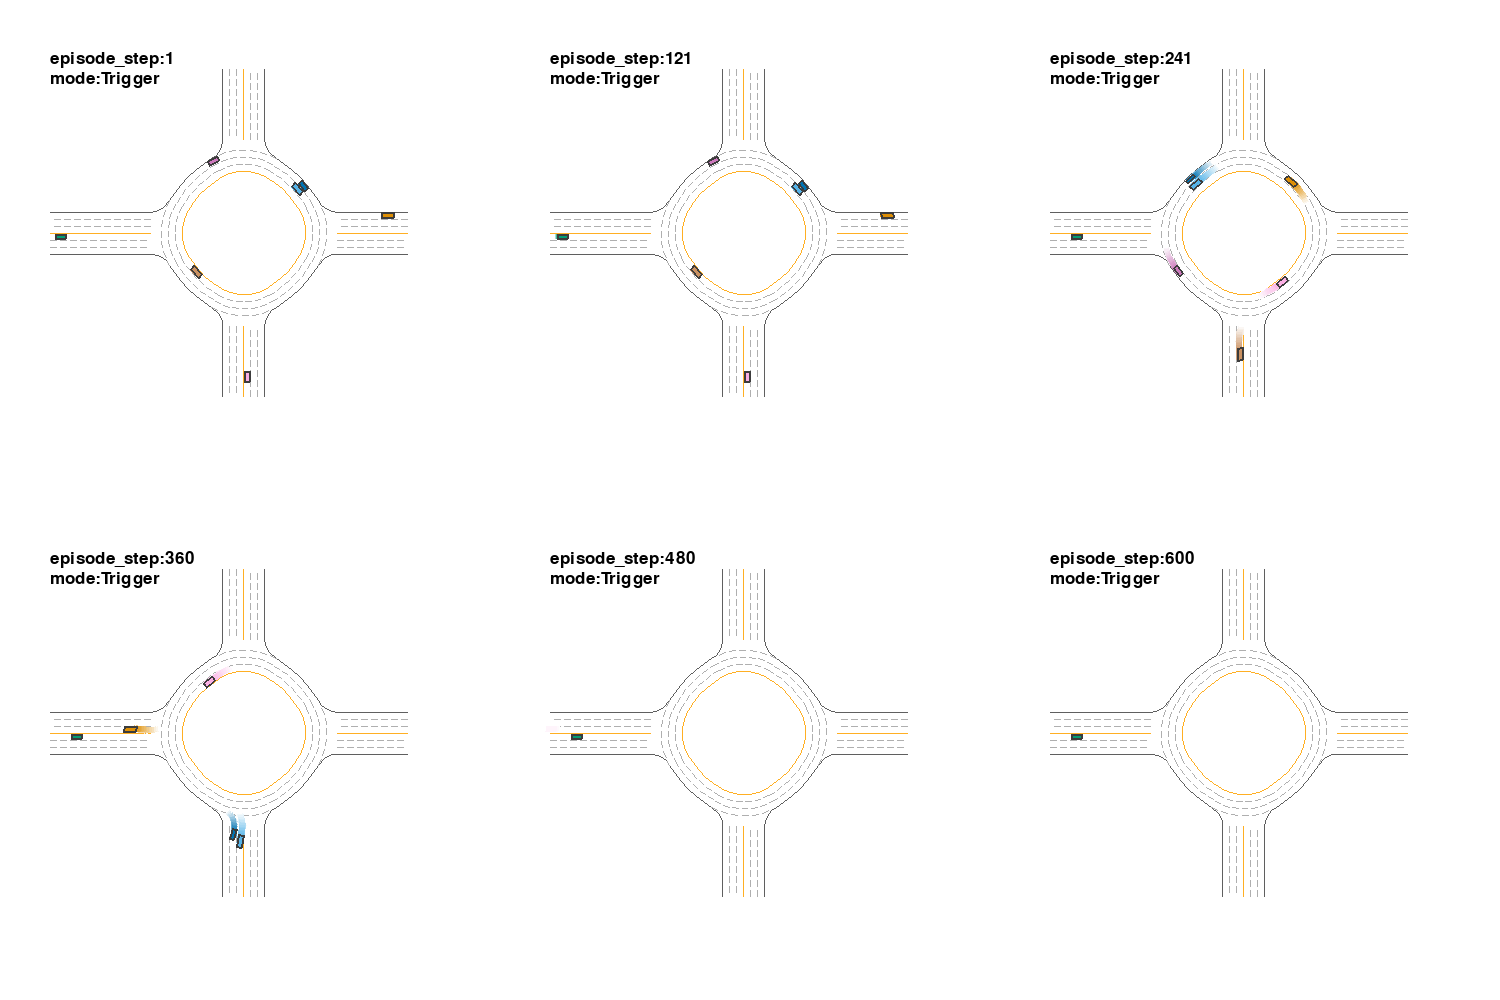
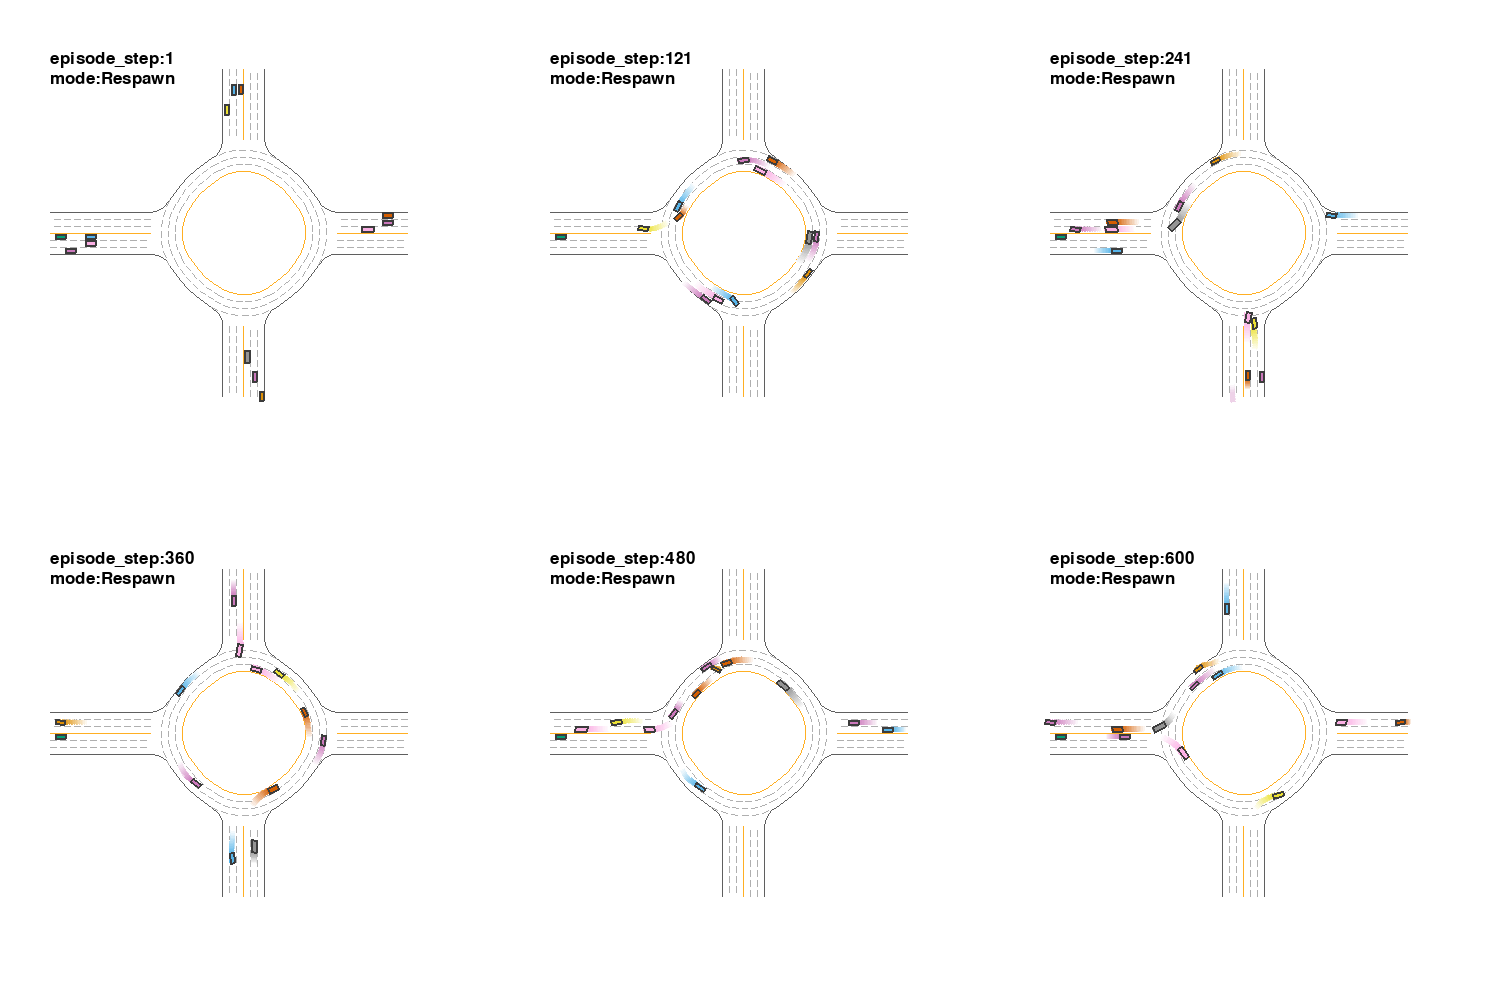
By changing the mode to respawn, the cars will be added into the scene at some places called spawn point when the scenario is initialized and move to their destination right now. After reaching the goal point and being recycled, they will be spawned again at the spawn points.
from metadrive import MetaDriveEnv

env = MetaDriveEnv(dict(traffic_mode="respawn", map="O", traffic_density=0.05))
env.reset(seed=0)
try:
    for _ in range(600):
        o,r,d,_,_ = env.step([0,0.0])
        env.render(mode="topdown",
                   scaling=2,
                   screen_size=(500, 500),
                   screen_record=True,
                   window=False,
                   camera_position=(100, 0),
                   text={"episode_step": env.engine.episode_step,
                         "mode": "Respawn"})
    env.top_down_renderer.generate_gif()
finally:
    env.close()
    clear_output()
Image(open("demo.gif", "rb").read())
There is also a mode called hybrid allows to allow respawning cars in the trigger mode.
from metadrive import MetaDriveEnv
from metadrive.policy.idm_policy import IDMPolicy

env = MetaDriveEnv(dict(traffic_mode="hybrid", map="O")) # Default, traffic density=0.1
env.reset(seed=0)
try:
    for i in range(600):
        o,r,d,_,_ = env.step([0,0.2] if i > 100 and i < 200 else [0, -0.5])
        env.render(mode="topdown",
                   scaling=2,
                   screen_size=(500, 500),
                   screen_record=True,
                   window=False,
                   camera_position=(100, 0),
                   text={"episode_step": env.engine.episode_step,
                         "mode": "Hybrid"})
    env.top_down_renderer.generate_gif()
finally:
    env.close()
    clear_output()
Image(open("demo.gif", "rb").read())
Map
The other important fields are map-related ones. It allows you to adjust map properties like the number of lanes and the structures. The full map config is
map_config={
    BaseMap.GENERATE_TYPE: MapGenerateMethod.BIG_BLOCK_NUM,
    BaseMap.GENERATE_CONFIG: None,  # it can be a file path / block num / block ID sequence
    BaseMap.LANE_WIDTH: 3.5,
    BaseMap.LANE_NUM: 3,
},
First of all, we need to determine the GENERATE_TYPE. The BIG algorithm provides two ways to generate map:
config["map_config"]["type"] = "block_num": the user specifies the number of blocks in each map so that the PG algorithm will automatically build maps containing that number of blocks while randomizing all parameters including the type of blocks.config["map_config"]["type"] = "block_sequence": the user specify the sequence of block types and PG algorithm will build maps strictly following that order while randomizing the parameters in each block.
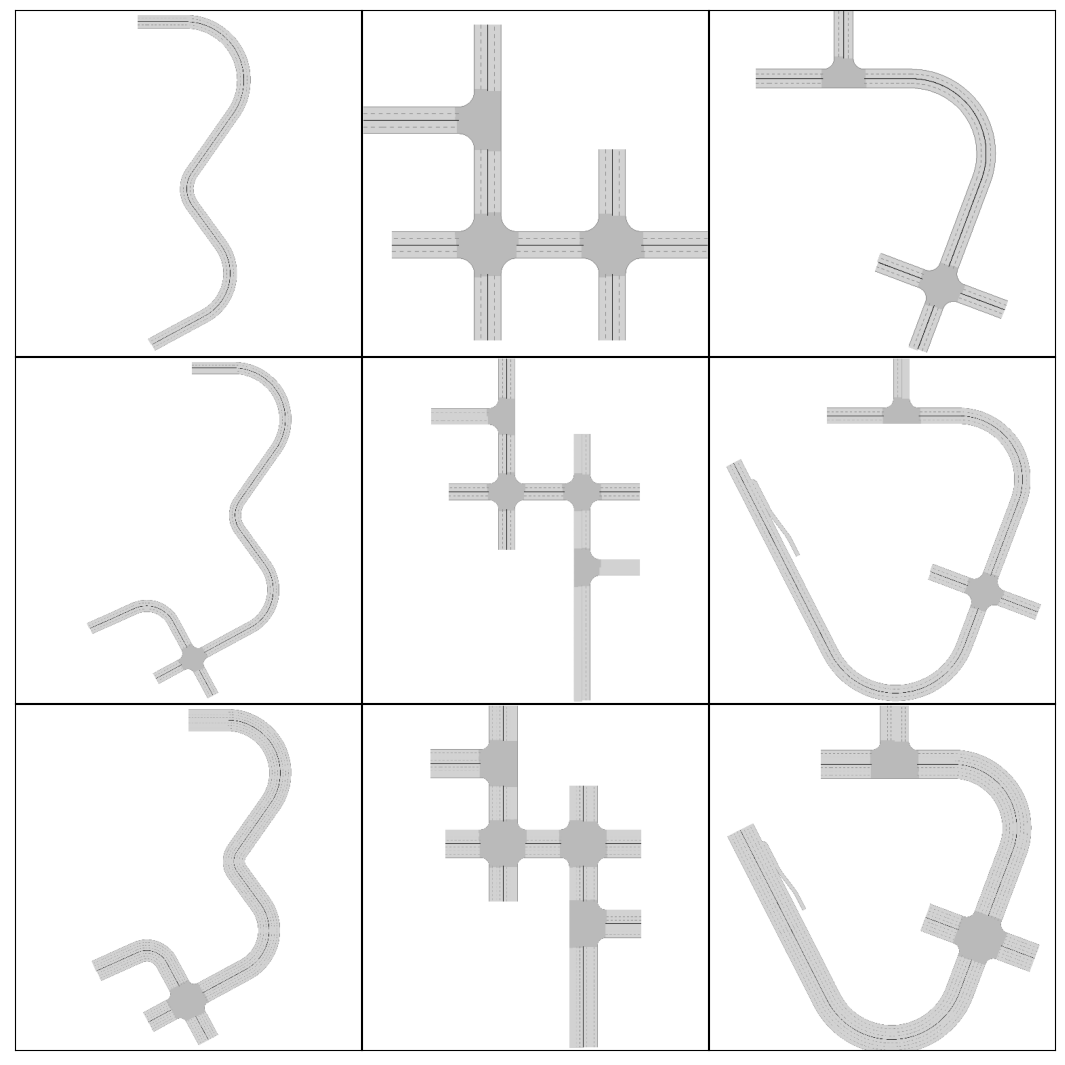
Let’s first introduce the block_num generation method. The following example shows how to generate maps in this way with other parameters changed. The first row shows maps generated with 3 blocks; The second row shows maps generated with 5 blocks; The last row shows maps generated with 5 blocks where each road has 4 lanes. As these maps are generated with the same random seed, in each column, each map is a part of another larger one or has a similar structure with another.
from metadrive import MetaDriveEnv
from metadrive.component.map.base_map import BaseMap
from metadrive.policy.idm_policy import IDMPolicy
from metadrive.component.map.pg_map import MapGenerateMethod
import matplotlib.pyplot as plt
from metadrive import MetaDriveEnv
from metadrive.utils.draw_top_down_map import draw_top_down_map
import logging
map_config={BaseMap.GENERATE_TYPE: MapGenerateMethod.BIG_BLOCK_NUM,
            BaseMap.GENERATE_CONFIG: 3,  # 3 block
            BaseMap.LANE_WIDTH: 3.5,
            BaseMap.LANE_NUM: 2}

fig, axs = plt.subplots(3, 3, figsize=(10, 10), dpi=200)
plt.tight_layout(pad=-3)

for i in range(3):
    if i==0:
        map_config["config"]=3
        env = MetaDriveEnv(dict(num_scenarios=10, map_config=map_config, log_level=logging.WARNING))
    elif i==1:
        map_config["config"]=5
        env = MetaDriveEnv(dict(num_scenarios=10, map_config=map_config, log_level=logging.WARNING))
    elif i==2:
        map_config["config"]=5
        map_config["lane_num"]=4
        env = MetaDriveEnv(dict(num_scenarios=10, map_config=map_config, log_level=logging.WARNING))
    for j in range(3):
        env.reset(seed=j)
        m = draw_top_down_map(env.current_map)
        ax = axs[i][j]
        ax.imshow(m, cmap="bone")
        ax.set_xticks([])
        ax.set_yticks([])
    env.close()
plt.show()
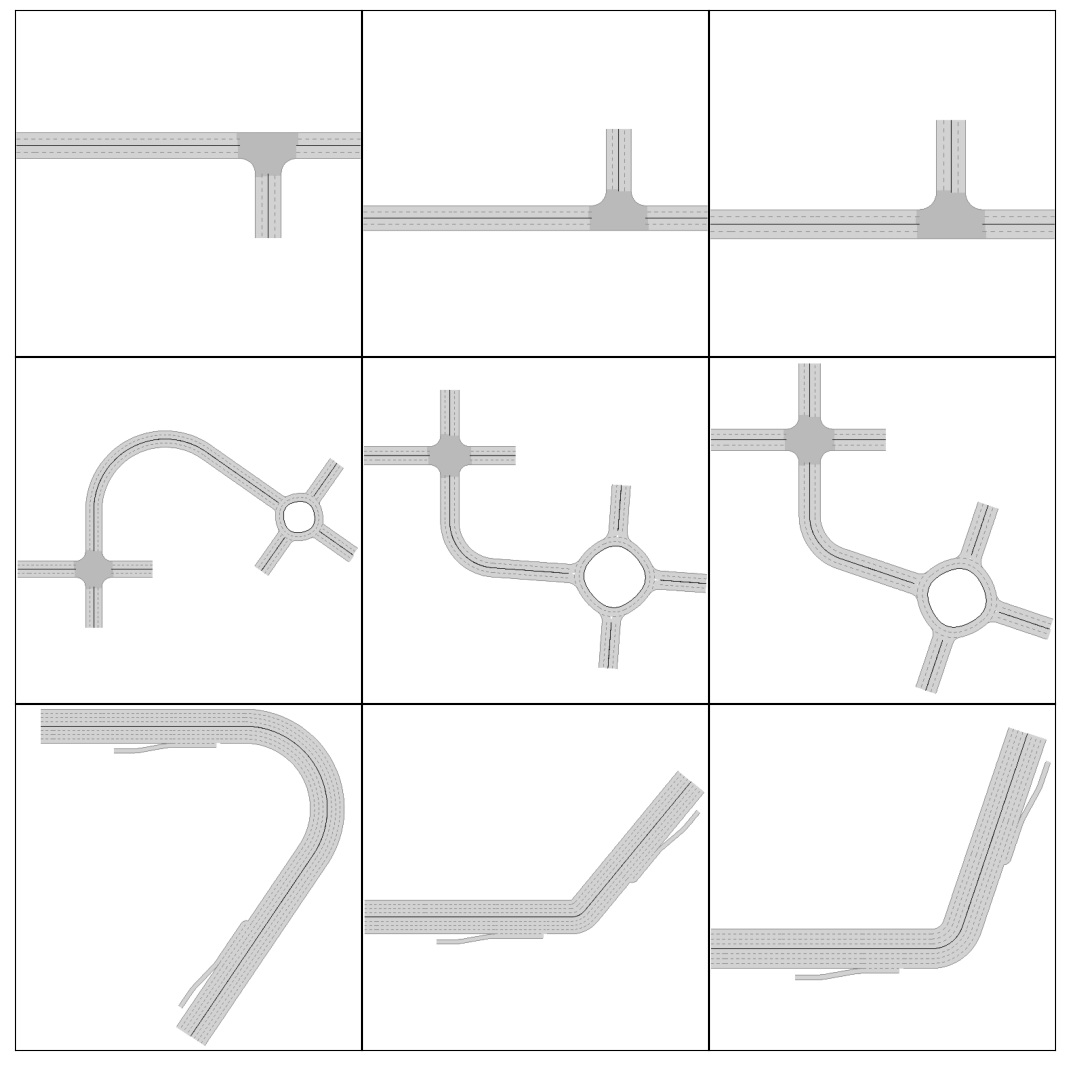
You can also specify the shape of the map with BaseMap.GENERATE_TYPE=MapGenerateMethod.BLOCK_SEQUENCE. Block sequence is a string with character selected from the following tables:
| Block Type | ID | Block Type | ID |
|---|---|---|---|
| Straight | S | Circular | C |
| InRamp | r | OutRamp | R |
| Roundabout | O | Intersection | X |
| Merge | y | Split | Y |
| Tollgate | $ | Parking lot | P |
| TInterection | T | Fork | WIP |
The number of block equals to the length of the string to specify the block sequence. The following example shows how to generate maps with a fixed block sequence.
map_config={BaseMap.GENERATE_TYPE: MapGenerateMethod.BIG_BLOCK_SEQUENCE,
            BaseMap.GENERATE_CONFIG: "XOS",  # 3 block
            BaseMap.LANE_WIDTH: 3.5,
            BaseMap.LANE_NUM: 2}

fig, axs = plt.subplots(3, 3, figsize=(10, 10), dpi=200)
plt.tight_layout(pad=-3)

for i in range(3):
    if i==0:
        map_config["config"]="ST"
        env = MetaDriveEnv(dict(num_scenarios=10, map_config=map_config, log_level=logging.WARNING))
    elif i==1:
        map_config["config"]="XCO"
        env = MetaDriveEnv(dict(num_scenarios=10, map_config=map_config, log_level=logging.WARNING))
    elif i==2:
        map_config["config"]="rCR"
        map_config["lane_num"]=4
        env = MetaDriveEnv(dict(num_scenarios=10, map_config=map_config, log_level=logging.CRITICAL))
    for j in range(3):
        env.reset(seed=j)
        m = draw_top_down_map(env.current_map)
        ax = axs[i][j]
        ax.imshow(m, cmap="bone")
        ax.set_xticks([])
        ax.set_yticks([])
    env.close()
plt.show()
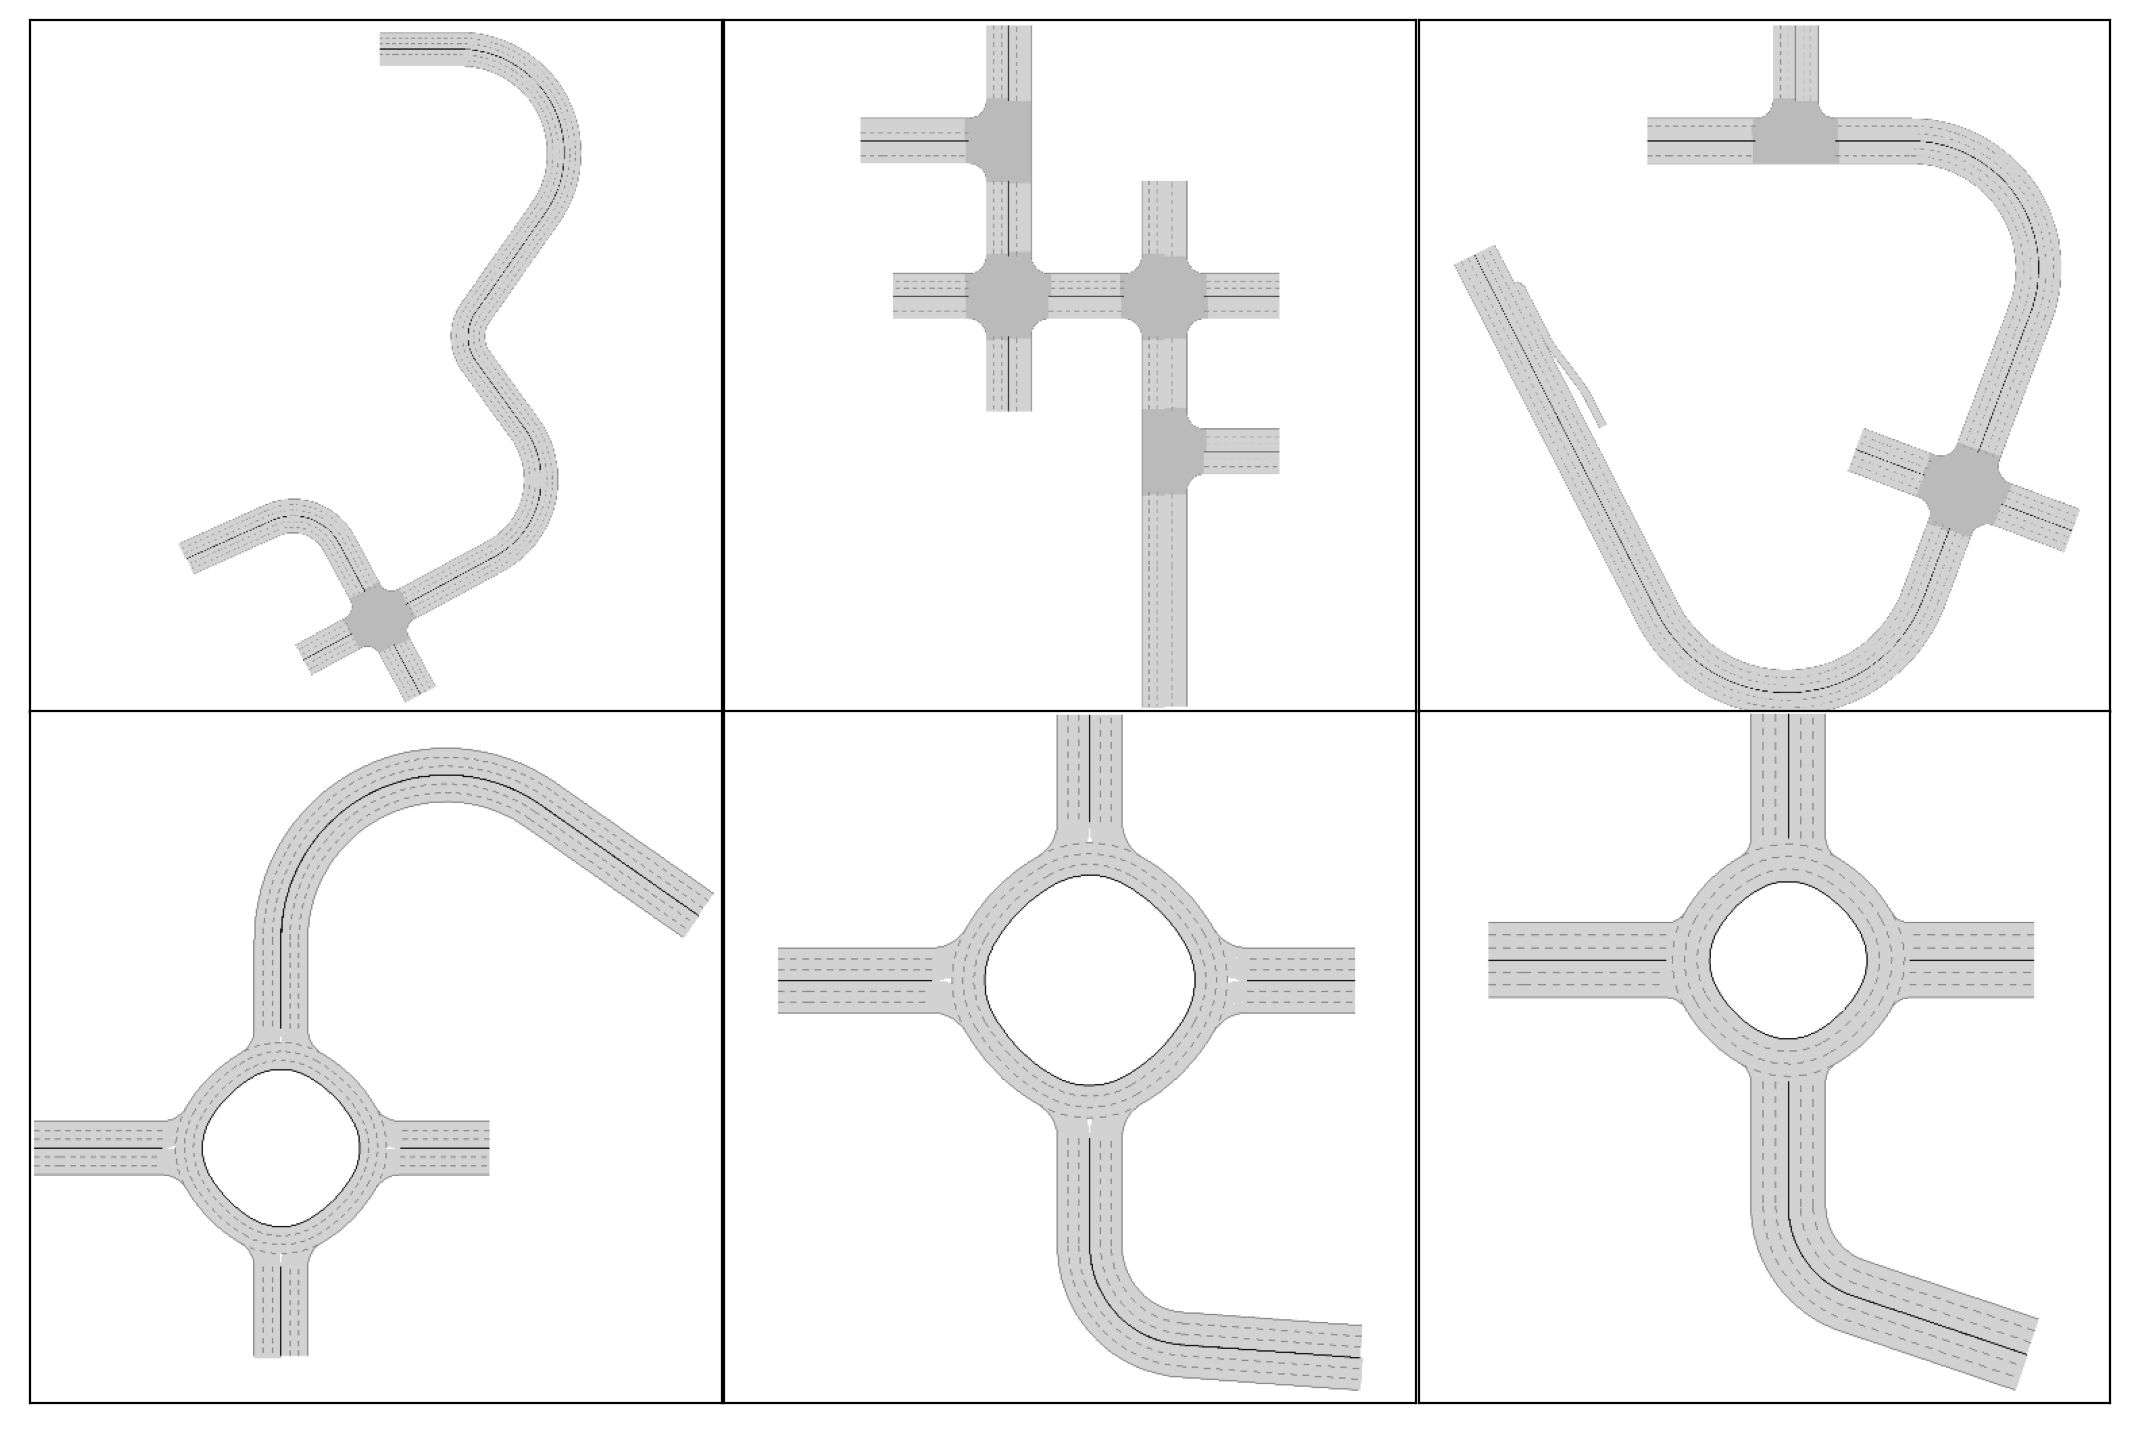
If you only want to change the number and width of lanes, you don’t need to set the complex map_config. You can use map to quickly configure it. User can set a string or int as the value to generate map in an easier way. For example, config["map"] = 3 means generating a map containing 3 blocks, while config["map"] = "SCrRX" means the first block is Straight, and the following blocks are Circular, InRamp, OutRamp and Intersection. The character here are the unique ID of different types of blocks as shown in the table above.
In a nutshell, if the value of map is a number, the map generation method would be BIG_BLOCK_NUM. If the value is a string, the map generation method would be BIG_BLOCK_SEQUENCE.
In the following example, maps in the first row are composed with 5 blocks, while the maps in the second row are all composed with a roundabout and a curve road.
fig, axs = plt.subplots(2, 3, figsize=(10, 6.5), dpi=200)
plt.tight_layout(pad=-3)

for i in range(2):
    if i==0:
        env = MetaDriveEnv(dict(num_scenarios=10, map=5, log_level=logging.WARNING))
    elif i==1:
        map_config["config"]="XCO"
        env = MetaDriveEnv(dict(num_scenarios=10, map="OC", log_level=logging.WARNING))
    for j in range(3):
        env.reset(seed=j)
        m = draw_top_down_map(env.current_map)
        ax = axs[i][j]
        ax.imshow(m, cmap="bone")
        ax.set_xticks([])
        ax.set_yticks([])
    env.close()
plt.show()
VaryingDynamics Environment
Actually, we provide an upgraded version for generalization environment with full PG functionality and can additionally randomize the dynamics of ego vehicle.
The environment is called VaryingDynamicsEnv and you can control the random_dynamics dict in the config
to adjust the randomizing range of specific dynamics parameters.
In the below example (which is also the default config), we randomize the dynamics of vehicle to the lowest and highest limit we recommended.
from metadrive.envs.varying_dynamics_env import VaryingDynamicsEnv
from metadrive.component.vehicle.vehicle_type import vehicle_type
import tqdm
import logging

training_env = VaryingDynamicsEnv(dict(
        num_scenarios=1000,

        # Stop randomizing them
        # random_lane_width=True,
        # random_agent_model=True,
        # random_lane_num=True

        # We will sample each parameter from (min_value, max_value)
        # You can set it to None to stop randomizing the parameter.
        random_dynamics=dict(
            max_engine_force=(100, 3000),
            max_brake_force=(20, 600),
            wheel_friction=(0.1, 2.5),
            max_steering=(10, 80),  # The maximum steering angle if action = +-1
            mass=(300, 3000)
        ),
        log_level=logging.WARNING
    ))
env_seed=1000
lane_nums = set()
lane_widths = set()
vehicle_models = set()
traffic_vehicle_models = set()

# collect statistics
to_collect_set = {k: set() for k in ["max_engine_force",
                                     "max_brake_force",
                                     "wheel_friction",
                                     "max_steering",
                                     "mass"]}

maps_to_sample = 50
end_seed = training_env.config["start_seed"] + maps_to_sample
for env_seed in range(training_env.config["start_seed"], end_seed):

    # use `seed` argument to choose which scenario to run
    training_env.reset(seed=env_seed)
    lane_nums.add(training_env.current_map.config["lane_num"])
    lane_widths.add(training_env.current_map.config["lane_width"])
    vehicle_models.add(training_env.agent.__class__.__name__)
    traffic_models = set([obj.__class__ for obj in training_env.engine.traffic_manager.spawned_objects.values()])
    traffic_vehicle_models = traffic_vehicle_models.union(traffic_models)
    assert vehicle_type[training_env.agent.config["vehicle_model"]] is training_env.agent.__class__

    # collect more
    for k, v in to_collect_set.items():
        v.add(training_env.agent.config[k])

training_env.close()

print("Number of lanes in {} maps are: {}".format(maps_to_sample, lane_nums))
print("{} maps have {} different widths".format(maps_to_sample, len(lane_widths)))
print("The policy is learning to drive vehicles with {} different dyamics".format(len(to_collect_set["wheel_friction"])))

assert all([len(s)==50 for s in to_collect_set.values()])
assert lane_nums == {3}
assert len(lane_widths) == 1
assert vehicle_models == set([vehicle_type["varying_dynamics"].__name__])
assert len(traffic_vehicle_models) == 4
Number of lanes in 50 maps are: {3}
50 maps have 1 different widths
The policy is learning to drive vehicles with 50 different dyamics
Wheel Friction Example
In the very early stage of MetaDrive, we have experimented randomizing the wheel_friction in the training environment.
We find that wheel_friction > 1.2 makes little impact to the performance. So you can try a training environment
with wheel_friction in [1.0, 1.4) and test the trained agent in wheel_friction in [0.6, 1.0).
The training environment is significantly easier than the test environment.
We are expecting that the agent trained in less training scenarios will perform poorly in the test environment.
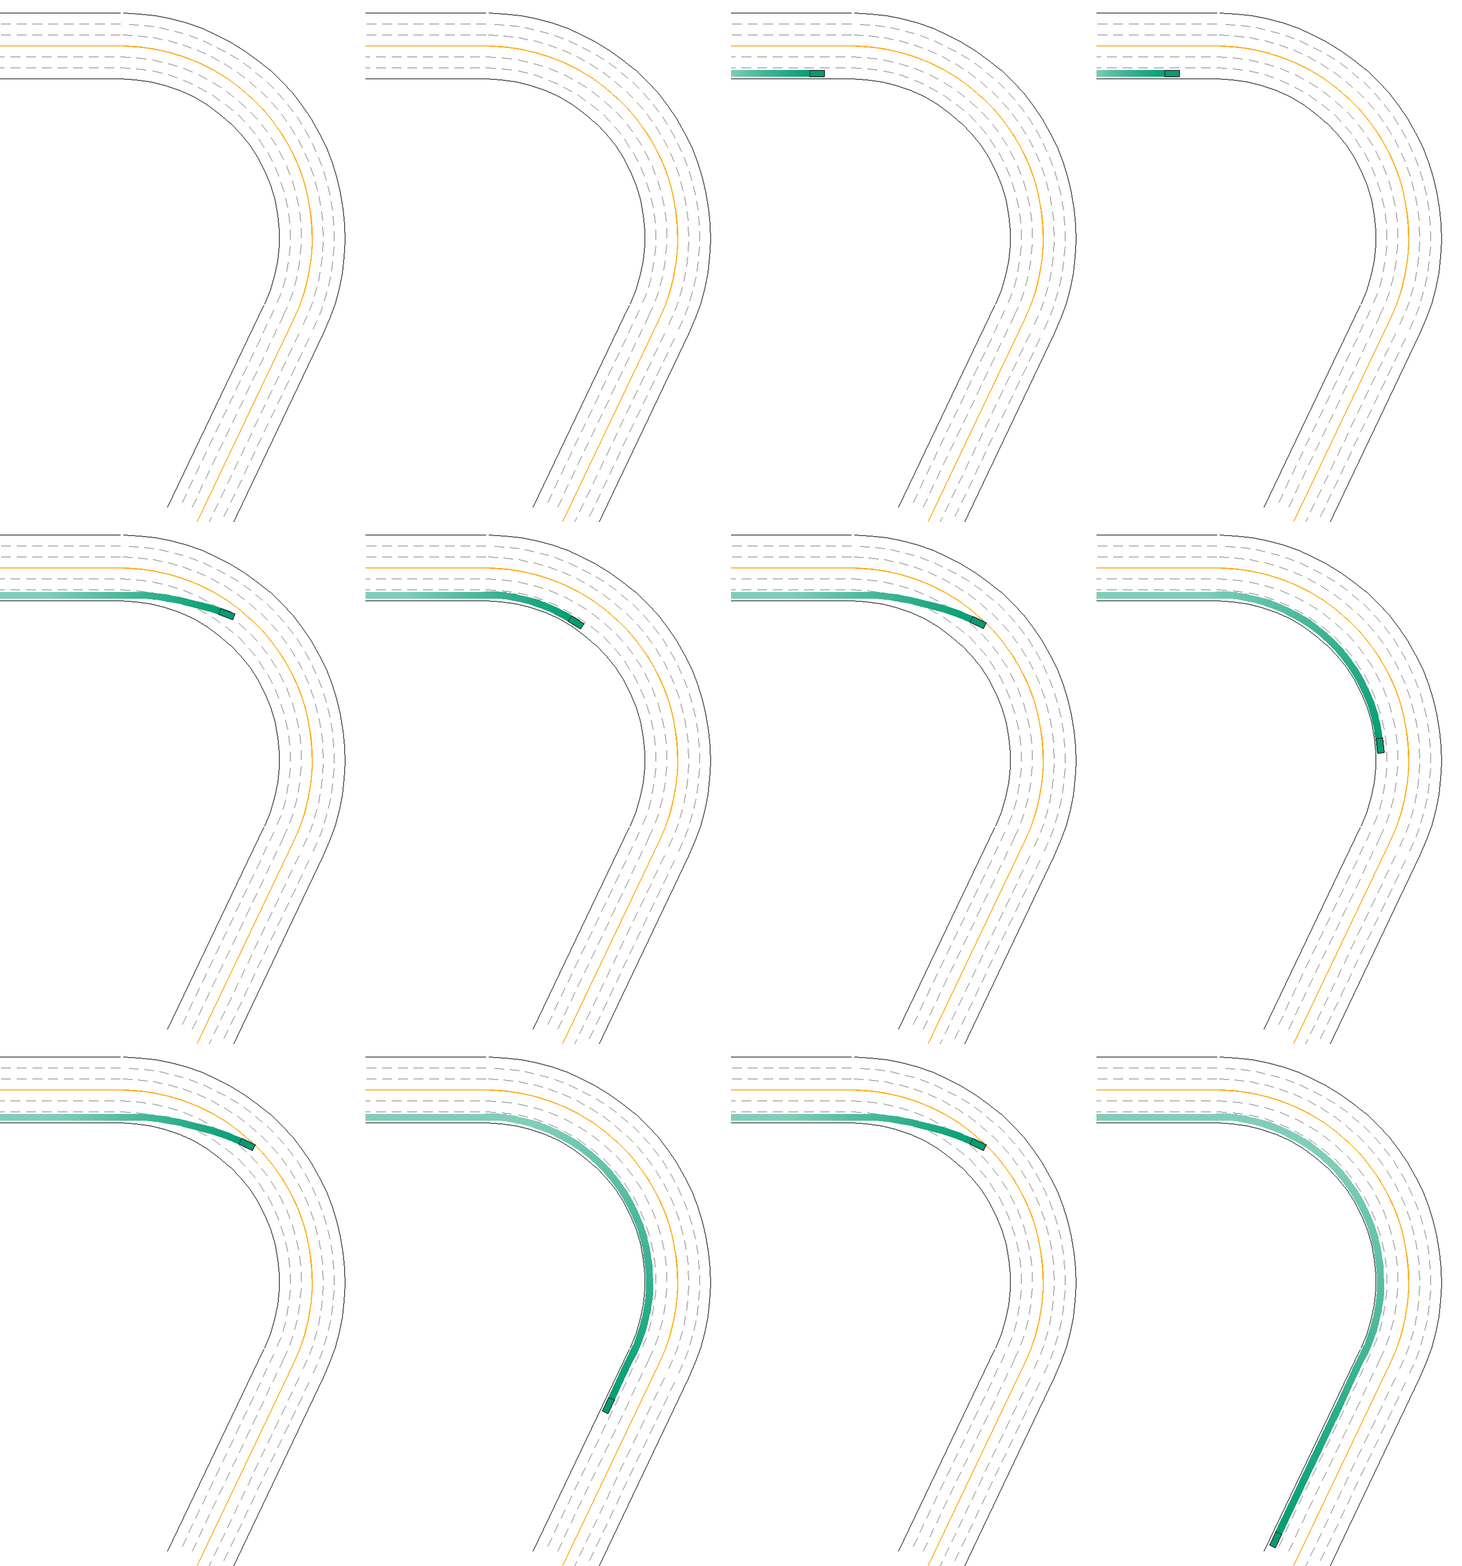
The following example shows two episode with different wheel_friction. It is obvious that the car with high wheel_friction can pass the curve roads, while the car with low wheel_friction fails.
from metadrive.policy.idm_policy import IDMPolicy
from metadrive.envs.varying_dynamics_env import VaryingDynamicsEnv
import pygame
import matplotlib.pyplot as plt
from metadrive.utils import generate_gif
import cv2
from IPython.display import Image


def run_env(friction):
    env = VaryingDynamicsEnv(dict(num_scenarios=1,
                                  traffic_density=0,
                                  agent_policy=IDMPolicy,
                                  map="C",
                                  random_dynamics=dict(wheel_friction=(friction, friction)),
                                  log_level=50))
    env.reset(seed=0)
    try:
        for i in range(1000):
            o,r,d,_,info = env.step([0,0])
            env.render(mode="topdown",
                       scaling=6,
                       window=False,
                       camera_position=(70, -60),
                       screen_size=(700, 1000),
                       screen_record=True,
                       draw_target_vehicle_trajectory=True)
            if d:
                assert info["out_of_road"] if friction < 0.2 else info["arrive_dest"]
                break
        frames=env.top_down_renderer.screen_frames
    finally:
        env.close()
    return frames

# draw
f_1=run_env(0.1)
f_2=run_env(1.2)
frames = []
for i in range(len(f_2)):
    frames.append(cv2.hconcat([f_1[min(i, len(f_1)-1)], f_2[i]]))
generate_gif(frames)
Image(open("demo.gif", "rb").read())
Termination
The termination or done function defines when the tm from _,_,tm,_,_ = env.step() should True. In the example above, you will find the scenario ends up with collision. That is because we defined that when crash happens, the episode should end in env.done_function. This all environments should have this function. Besides the official done function, users are encouraged to design their own done_function as well. It should be something like:
from metadrive.utils import print_source
from metadrive import MetaDriveEnv
print_source(MetaDriveEnv.done_function)
def done_function(self, vehicle_id: str):
    vehicle = self.agents[vehicle_id]
    done = False
    max_step = self.config["horizon"] is not None and self.episode_lengths[vehicle_id] >= self.config["horizon"]
    done_info = {
        TerminationState.CRASH_VEHICLE: vehicle.crash_vehicle,
        TerminationState.CRASH_OBJECT: vehicle.crash_object,
        TerminationState.CRASH_BUILDING: vehicle.crash_building,
        TerminationState.CRASH_HUMAN: vehicle.crash_human,
        TerminationState.CRASH_SIDEWALK: vehicle.crash_sidewalk,
        TerminationState.OUT_OF_ROAD: self._is_out_of_road(vehicle),
        TerminationState.SUCCESS: self._is_arrive_destination(vehicle),
        TerminationState.MAX_STEP: max_step,
        TerminationState.ENV_SEED: self.current_seed,
        # TerminationState.CURRENT_BLOCK: self.agent.navigation.current_road.block_ID(),
        # crash_vehicle=False, crash_object=False, crash_building=False, out_of_road=False, arrive_dest=False,
    }

    # for compatibility
    # crash almost equals to crashing with vehicles
    done_info[TerminationState.CRASH] = (
        done_info[TerminationState.CRASH_VEHICLE] or done_info[TerminationState.CRASH_OBJECT]
        or done_info[TerminationState.CRASH_BUILDING] or done_info[TerminationState.CRASH_SIDEWALK]
        or done_info[TerminationState.CRASH_HUMAN]
    )

    # determine env return
    if done_info[TerminationState.SUCCESS]:
        done = True
        self.logger.info(
            "Episode ended! Scenario Index: {} Reason: arrive_dest.".format(self.current_seed),
            extra={"log_once": True}
        )
    if done_info[TerminationState.OUT_OF_ROAD]:
        done = True
        self.logger.info(
            "Episode ended! Scenario Index: {} Reason: out_of_road.".format(self.current_seed),
            extra={"log_once": True}
        )
    if done_info[TerminationState.CRASH_VEHICLE] and self.config["crash_vehicle_done"]:
        done = True
        self.logger.info(
            "Episode ended! Scenario Index: {} Reason: crash vehicle ".format(self.current_seed),
            extra={"log_once": True}
        )
    if done_info[TerminationState.CRASH_OBJECT] and self.config["crash_object_done"]:
        done = True
        self.logger.info(
            "Episode ended! Scenario Index: {} Reason: crash object ".format(self.current_seed),
            extra={"log_once": True}
        )
    if done_info[TerminationState.CRASH_BUILDING]:
        done = True
        self.logger.info(
            "Episode ended! Scenario Index: {} Reason: crash building ".format(self.current_seed),
            extra={"log_once": True}
        )
    if done_info[TerminationState.CRASH_HUMAN] and self.config["crash_human_done"]:
        done = True
        self.logger.info(
            "Episode ended! Scenario Index: {} Reason: crash human".format(self.current_seed),
            extra={"log_once": True}
        )
    if done_info[TerminationState.MAX_STEP]:
        # single agent horizon has the same meaning as max_step_per_agent
        if self.config["truncate_as_terminate"]:
            done = True
        self.logger.info(
            "Episode ended! Scenario Index: {} Reason: max step ".format(self.current_seed),
            extra={"log_once": True}
        )
    return done, done_info
This is the done function of MetaDriveEnv. There are several config can turn off/turn on specific done conditions like crash_vehicle_done and crash_object_done. When they are set to False, the crash won’t throw a termination signal out. More termination config is available at Reward, Cost and Termination.
Safety Environments
Safety is a major concern for the trial-and-error nature of RL. As driving itself is a safety-critical application, it is essential to evaluate the constrained optimization methods under the domain of autonomous driving. We therefore define a new suite of environments to benchmark the safe exploration in RL. As shown in the left panel of the figure above, we randomly display static and movable obstacles in the traffic flow where frequent lane changing and emergence brake are required.
The following script can setup such environment. Same as in generalization environment, you can also specify the number of environment and the start seed to initialize two sets of environments to train and test the RL agents and benchmark their safety generalization. You can experience the safety environment via
python -m metadrive.examples.drive_in_safe_metadrive_env
Accident Probability
The environment-specific parameter is accident_prob, which controls the density of obstacles on the road. The more traffic objects there are, the more challenging the scenario becomes. Apart from this, all parameters are the same as generalization environment. The accepted parameter for this field ranges from [0, 1.0]. A higher value will make the traffic object more dense.
from metadrive import SafeMetaDriveEnv

def run_env(density):
    env=SafeMetaDriveEnv(dict(map="CCCCC", accident_prob = density, log_level=50))
    env.reset(seed=0)
    obj_num=len(env.engine.object_manager.spawned_objects)
    print("There are {} traffic objects on the map with accident_prob={}".format(obj_num,density))
    env.close()

run_env(0.1)
run_env(1)
There are 12 traffic objects on the map with accident_prob=0.1
There are 27 traffic objects on the map with accident_prob=1
Termination and Cost
Different from the generalization task, we set crash_vehicle_done=False and crash_object_done=False and thus do not terminate the agent if a collision with those obstacles and traffic vehicles happens.
Instead, we allow agent to continue driving but flag the crash with a cost. The concrete value of the cost when collision happens is defined by out_of_road_cost, crash_vehicle_cost, and crash_object_cost.
Thus as safe exploration task, the learning agent is required to balance the reward and the cost to solve the constrained optimization problem.
In the following example, we put a cone in front of the car.
When the car collides with the cone, the cost will be recorded in the info dict.
from metadrive import SafeMetaDriveEnv
from metadrive.component.static_object.traffic_object import TrafficCone
import os

try:
    env=SafeMetaDriveEnv(dict(crash_object_cost=-5,
                              random_spawn_lane_index=False,
                              # use 3D renderer
                              use_render=not os.getenv('TEST_DOC')))
    env.reset(seed=0)
    cone=env.engine.spawn_object(TrafficCone, position=[20, 7], heading_theta=0)
    for _ in range(100):
        o,r,d,_,info = env.step([0, 1])
        if env.agent.crash_object:
            assert info["cost"] == -5
            break
    env.engine.clear_objects([cone.id])
finally:
    env.close()
Multi-agent Environments
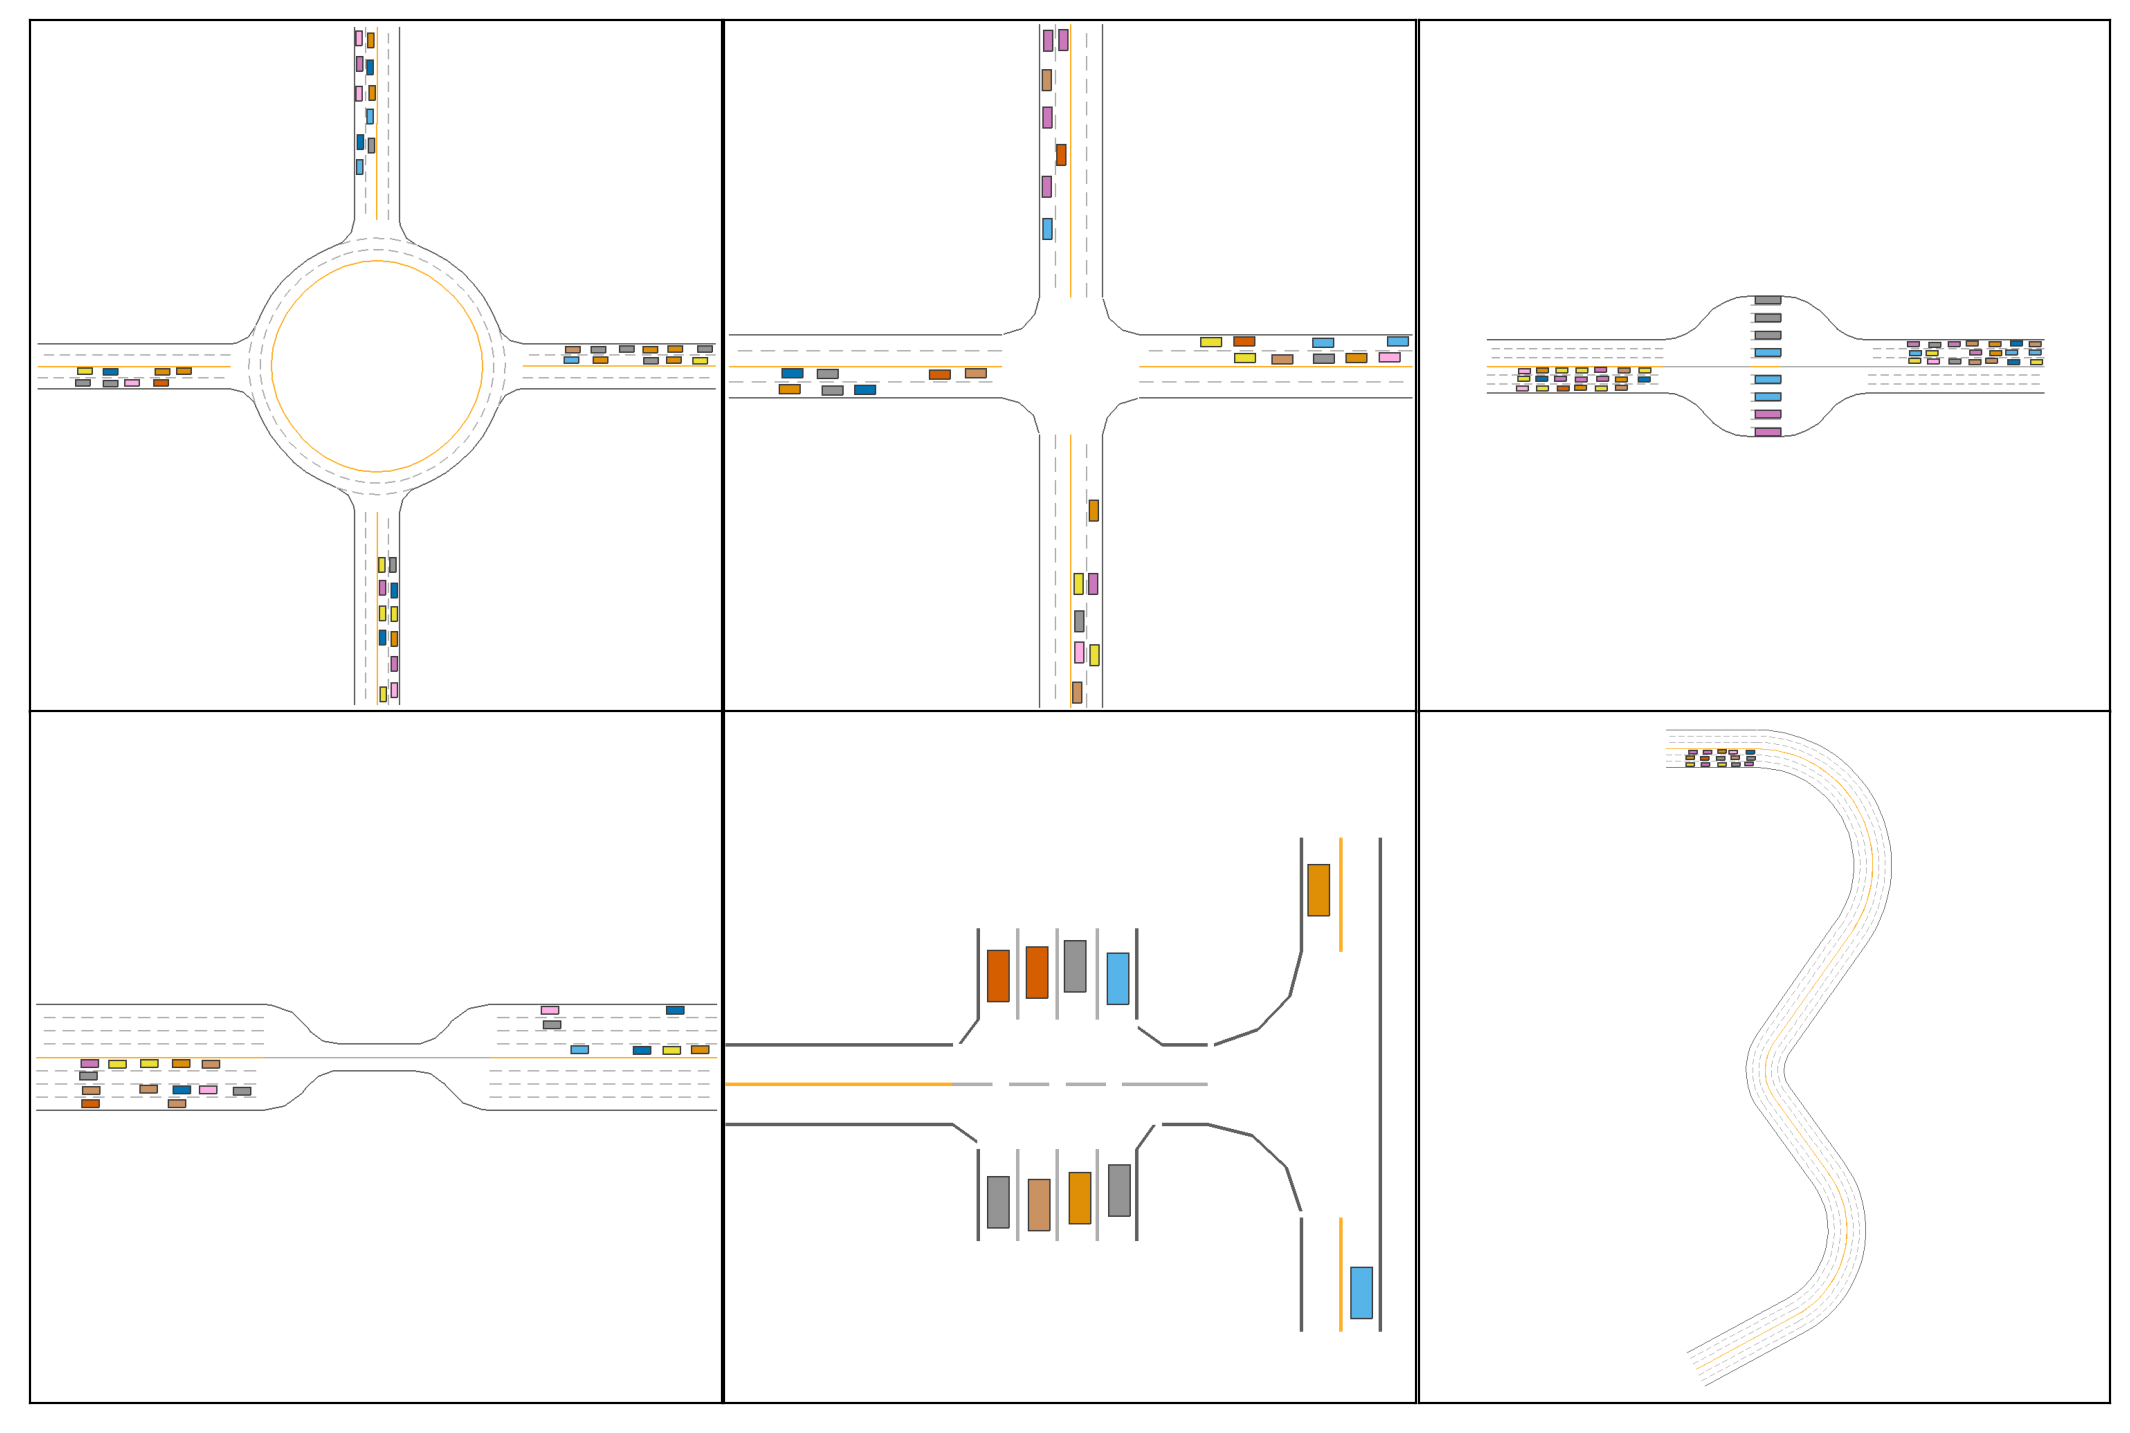
As shown in the above figure, we develop a set of environments to evaluate MARL methods for simulating traffic flow. The descriptions and typical settings of the six traffic environments are as follows:
Roundabout: A four-way roundabout with two lanes. 40 vehicles spawn during environment reset. This environment includes merge and split junctions.
Intersection: An unprotected four-way intersection allowing bi-directional traffic as well as U-turns. Negotiation and social behaviors are expected to solve this environment. We initialize 30 vehicles.
Tollgate: Tollgate includes narrow roads to spawn agents and ample space in the middle with multiple tollgates. The tollgates create static obstacles where the crashing is prohibited. We force agent to stop at the middle of tollgate for 3s. The agent will fail if they exit the tollgate before being allowed to pass. 40 vehicles are initialized. Complex behaviors such as deceleration and queuing are expected. Additional states such as whether vehicle is in tollgate and whether the tollgate is blocked are given.
Bottleneck: Complementary to Tollgate, Bottleneck contains a narrow bottleneck lane in the middle that forces the vehicles to yield to others. We initialize 20 vehicles.
Parking Lot: A compact environment with 8 parking slots. Spawn points are scattered in both parking lots or in external roads. 10 vehicles spawn initially and need to navigate toward external roads or enter parking lots. In this environment, we allow agents to back their cars to spare space for others. Maneuvering and yielding are the key to solve this task.
PGMA (Procedural Generation Multi-Agent environment): We reuse the procedurally generated scenarios in the generalization environment and replaces the traffic vehicles by controllable target vehicles. These environments contain rich interactions between agents and complex road structures. This multi-agent environment introduces new challenge under the setting of mixed motive RL. Each constituent agent in this traffic system is self-interested and the relationship between agents is constantly changing.
You can try to drive a vehicle in Multi-agent environment through this example:
# args:
# --env: roundabout, intersection, tollgate, bottleneck, parkinglot, pgma
# --topdown
python -m metadrive.examples.drive_in_multi_agent_env --env pgma
For using these environments in your code, the following script initialize arbitrary Multi-agent environment and visualizes these environments are as follows:
import matplotlib.pyplot as plt
from metadrive import (
    MultiAgentMetaDrive,
    MultiAgentTollgateEnv,
    MultiAgentBottleneckEnv,
    MultiAgentIntersectionEnv,
    MultiAgentRoundaboutEnv,
    MultiAgentParkingLotEnv
)

env_classes = dict(
    roundabout=MultiAgentRoundaboutEnv,
    intersection=MultiAgentIntersectionEnv,
    tollgate=MultiAgentTollgateEnv,
    bottleneck=MultiAgentBottleneckEnv,
    parkinglot=MultiAgentParkingLotEnv,
    pgma=MultiAgentMetaDrive
)

fig, axs = plt.subplots(2, 3, figsize=(10, 6.5), dpi=200)
plt.tight_layout(pad=-3)

for i in range(2):
    for j in range(3):
        env = list(env_classes.values())[i*3+j]({"log_level":50})
        env.reset(seed=0)
        m = env.render(mode="topdown",
                       # get the overview of the scene
                       film_size = (1000, 1000),
                       screen_size = (1000, 1000),
                       # set camer to map center
                       camera_position=env.current_map.get_center_point(),
                       # auto determine the number of pixels for 1 meter
                       scaling=None,
                       # do not pop window
                       window=False)
        ax = axs[i][j]
        ax.imshow(m, cmap="bone")
        ax.set_xticks([])
        ax.set_yticks([])
        env.close()
plt.show()
Number of Agents
The more agents there are, the harder the MARL task is.
You can change the number of agents in the environment with the value of field num_agents in the config dict.
Note there is a upper bound for the number of agents that can be accommodated in each environment.
Respawn
Besides, in Multi-agent environment, the controllable target vehicles consistently respawn in the scene if old target vehicles are terminated.
If you wish to disable the respawning mechanism in MARL, set the config allow_respawn = False. In this case, the environmental episode will terminate if no active vehicles are in the scene.
MARL Termination
In Multi-agent environment, the termination criterion for each vehicle is identical to that in single-agent environment.
Like the SafeMetaDriveEnv, we explicitly add two config to adjust the termination processing in MARL: crash_done = True and out_of_road_done = True.
They denote whether to terminate the agent episode if crash / out of road happens.
Like single-agent environment, config horizon = 1000 can be used in MARL environments as well to limit the length of environmental episode.
The environmental episode has a minimal length of horizon steps and the environment will stop spawning new target vehicles if this horizon is exceeded.
Also, the agent which exists more than horizon steps will be terminated as well.
You can adjust them to change the termination condition or compose your own done_function.
There is another key called delay_done whose unit is substep. It denotes the terminated agent won’t be recycled until delay_done substeps are taken. decision_repeat defines how many substeps will be executed in each env.step(). The default value is set to 5. The simulation time will progress physics_world_step_size when executing one substep. By default, the physics_world_step_size is 0.02. Consequently, if we want to recycle the vehicle 10 seconds later after it is terminated, we can set delay_done as 50.
Feel free to change the value of these keys in the following intersection example to experience these features.
from metadrive import  MultiAgentIntersectionEnv

env = MultiAgentIntersectionEnv(dict(num_agents=40,
                                     delay_done=5,
#                                      allow_respawn=False
                                     ))
o,_=env.reset(seed=0)
try:
    while True:
        last_o=o
        o,r,tm,_,i=env.step({agent_id: [0, 1] for agent_id in env.agents.keys()})
        m = env.render(mode="topdown",
                   film_size = (1000, 1000),
                   screen_size = (1000, 1000),
                   camera_position=env.current_map.get_center_point(),
                   scaling=None)
        if tm["__all__"]:
            break

        # for test only
        assert len(env.agents)<=env.config["num_agents"]
        if not env.config["allow_respawn"]:
            assert len(o)<=len(last_o)
finally:
    env.close()
Real-world Environment
The real-world environments are built from real-world driving datasets collected by Waymo, nuPlan, nuScenes, Argoverse and so on. We provide converters for parsing driving data in various format into one unified format. As a result, MetaDrive can reconstruct and simulate the scenarios collected by different data providers, which greatly expands the scenario database. More details about setting up real-world data can be found at ScenarioNet.
Once you have built a driving dataset with scenarios described by MetaDrive format, you can launch the simulation for these real-world scenarios. We have included two mini split data from Waymo and nuScenes in MetaDrive asset. The script allows you to drive in real-world environment reconstructed with nuScenes or Waymo data:
# args:
# Using Waymo data: --waymo
# Using Topdown renderer --topdown
python -m metadrive.examples.drive_in_real_env
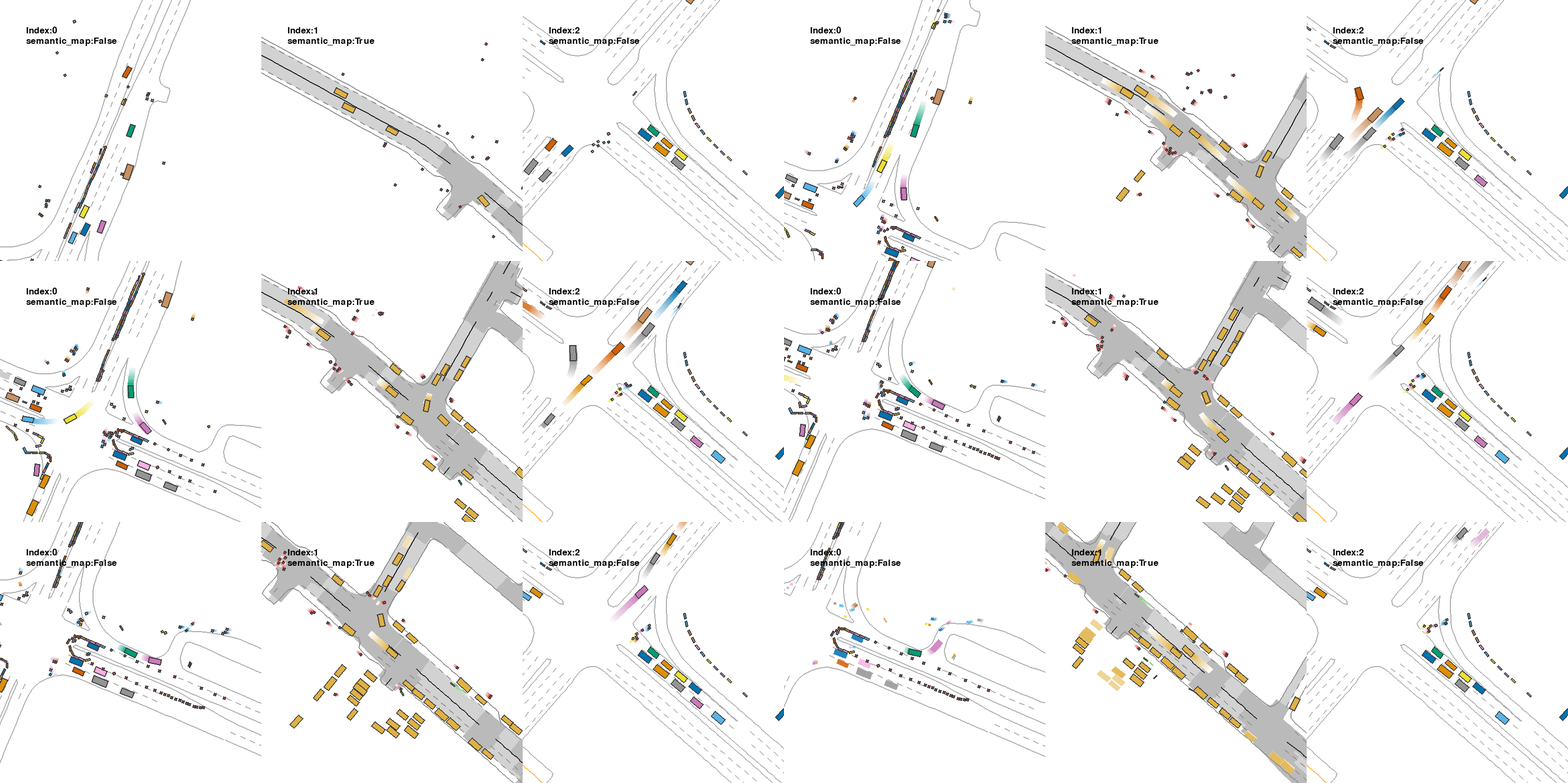
For using it in your code, import and use the ScenarioEnv and the full config is at SCENARIO_ENV_CONFIG. The following example shows 3 scenarios from nuScenes mini split. If your machine has OpenGL support, you can launch the 3D renderer as well by threeD_render=True.
from metadrive.engine.asset_loader import AssetLoader
from metadrive.policy.replay_policy import ReplayEgoCarPolicy
from metadrive.envs.scenario_env import ScenarioEnv
from metadrive.utils import generate_gif
from IPython.display import Image, clear_output
import cv2

# turn on this to enable 3D render. It only works when you have a screen
threeD_render=False
# Use the built-in datasets with simulator
nuscenes_data=AssetLoader.file_path(AssetLoader.asset_path, "nuscenes", unix_style=False)

env = ScenarioEnv(
    {
        "reactive_traffic": False,
        "use_render": threeD_render,
        "agent_policy": ReplayEgoCarPolicy,
        "data_directory": nuscenes_data,
        "num_scenarios": 3,
    }
)

try:
    scenarios={}
    for seed in range(3):
        print("\nSimulate Scenario: {}".format(seed))
        o, _ = env.reset(seed=seed)
        semantic_map = seed == 1
        for i in range(1, 100000):
            o, r, tm, tc, info = env.step([1.0, 0.])
            env.render(mode="top_down",
                       window=False,
                       screen_record=True,
                       text={"Index": seed,
                             "semantic_map": semantic_map},
                       screen_size=(500, 500),
                       semantic_map=semantic_map) # semantic topdown
            if info["replay_done"]:
                break
        scenarios[seed]=env.top_down_renderer.screen_frames
finally:
    env.close()

# make gif for three scenarios
frames=[]
min_len=min([len(scenario) for scenario in scenarios.values()])
for i in range(min_len):
    frames.append(cv2.hconcat([scenarios[s][i] for s in range(3)]))

clear_output()
generate_gif(frames)
Image(open("demo.gif", "rb").read())
Specifying Dataset
data_directory is used to specify the path to the dataset. Similar to start_seed used in single-agent environment, start_scenario_index and num_scenarios can be used to split a batch of data from the full dataset, so the scenarios whose index ranges in [start_scenario_index, start_scenario_index + num_scenarios] will be selected. Subsequently, env.reset(seed=index) can launch a specific scenario in the simulation. If you want to traverse all scenarios without specifying seed in env.reset(), you can set sequential_seed=True and each time when env.reset() is called, the engine will move the scenario to the scenaior whose index is current_scenario_index + 1.
Reactive Traffic
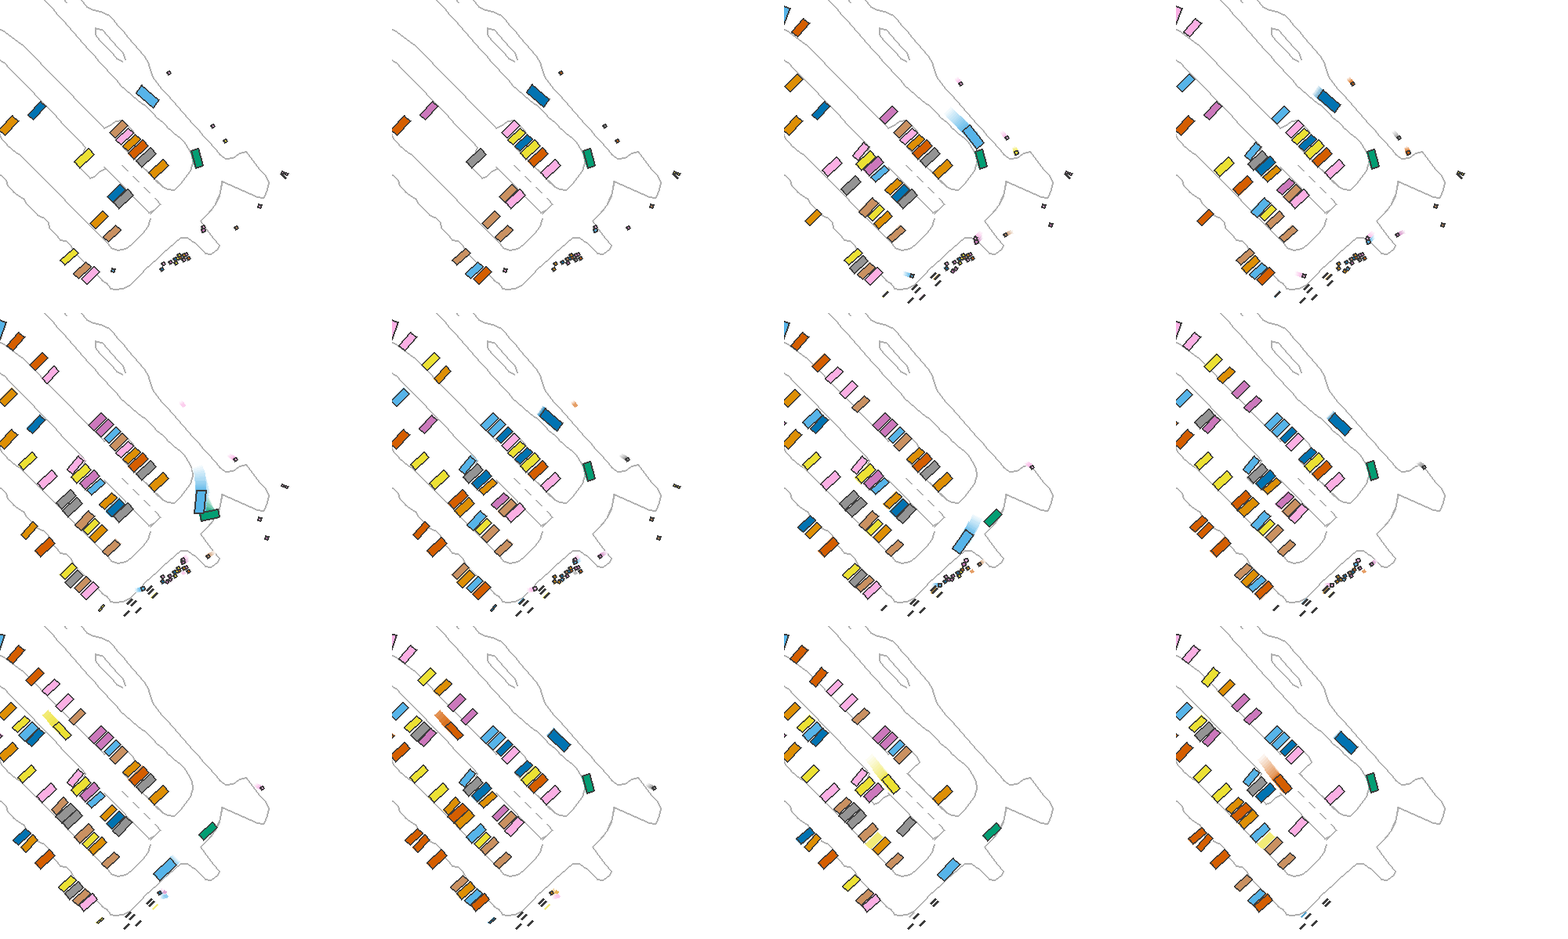
If the ego car is not trained to exactly follow the logged trajectories, traffic vehicles have to be reactive. Otherwise, rear-end collision with the ego car may happen, which is unreasonable.
In the following example, the green car is going to stop instead of keeping moving forward, while the car behind it can not realize it and thus collide with it. By setting reactive_traffic=True, at the same frame, we can see the car behind the ego car reacts to the ego car’s behavior and stops.
import numpy as np
from metadrive.engine.asset_loader import AssetLoader
from metadrive.policy.replay_policy import ReplayEgoCarPolicy
from metadrive.envs.scenario_env import ScenarioEnv
from metadrive.utils import generate_gif
import cv2
from IPython.display import Image

nuscenes_data =  AssetLoader.file_path(AssetLoader.asset_path, "nuscenes", unix_style=False)

def run_real_env(reactive):
    env = ScenarioEnv(
        {
            "reactive_traffic": reactive,
            "data_directory": nuscenes_data,
            "start_scenario_index":6, # use scenario #6
            "num_scenarios": 1,
            "crash_vehicle_done": True,
            "log_level": 50,
        }
    )
    try:
        o, _ = env.reset(seed=6) # start simulation for senario #6
        for i in range(1, 150):
            o, r, tm, tc, info = env.step([.0, -1])
            env.render(mode="top_down",
                       window=False,
                       screen_record=True,
                       camera_position=(0,0),
                       screen_size=(500, 400))
        frames=env.top_down_renderer.screen_frames
    finally:
        env.close()
    return frames

# visualization
f_1=run_real_env(False)
f_2=run_real_env(True)
frames = []
for i in range(len(f_1)):
    frames.append(cv2.hconcat([f_1[i], f_2[i]]))
generate_gif(frames)
Image(open("demo.gif", "rb").read())
Customization
We are developing new environments for benchmarking novel and challenging RL tasks! Any idea on the design of new tasks are welcomed!
However, you may want to do development with MetaDrive and build your own environments from scratch. To this end, you have to be familiar with some basic concepts of MetaDrive and how the simulation works. Please refer to the content under Concepts and Customiaiton and the section Developing Environments.
GymWrapper
Some legacy training frameworks may use the openai.gym interface whose step() function returns obs, reward, termination, and info. For making MetaDrive compatible with these training code, we provide an official wrapper for all environments of MetaDrive. The wrapped environment will have an openai.gym style APIs. Also, you can access all properties and methods of wrapped env using the same syntax. For example, we can still access the ego car via env.agent, even if the env is wrapped on top of MetaDriveEnv.
from metadrive.envs.gym_wrapper import createGymWrapper
from metadrive.envs.metadrive_env import MetaDriveEnv
import matplotlib.pyplot as plt

env_config = {"accident_prob": 1.0}
gym_env = createGymWrapper(MetaDriveEnv)(env_config)
try:
    o = gym_env.reset()
    o,r,d,i = gym_env.step([0,0])
    assert gym_env.config["accident_prob"] == 1.0
    print("Vehicle id:", gym_env.agent.id)
    ret=gym_env.render(mode="topdown",
                       window=False,
                       camera_position=(50, -70))
finally:
    gym_env.close()

plt.axis('off')
plt.imshow(ret)
[INFO] Environment: MetaDriveEnv
[INFO] MetaDrive version: 0.4.1.2
[INFO] Sensors: [lidar: Lidar(), side_detector: SideDetector(), lane_line_detector: LaneLineDetector()]
[INFO] Render Mode: none
[INFO] Horizon (Max steps per agent): None
[INFO] Assets version: 0.4.1.2
[INFO] Known Pipes: glxGraphicsPipe
[INFO] Start Scenario Index: 0, Num Scenarios : 1
Vehicle id: 4587b581-8c65-415f-beaf-daf861dc4f0c
<matplotlib.image.AxesImage at 0x7f9e7fe47c10>
